Deploying Web server on AWS using Terraform
Deploying Web server on AWS using Terraform

“The world is changing whether you like it or not. Get involved or get left behind.” ~Dave Waters
A s we all know the world is moving in a tremendous rate by automating the task as much as they can . It may be for cost cutting, reducing human errors , time and people get damn bored to do the repetitive task. Whatever it is , we need to adapt to this environment.
Here is an article which will guide you to deploy a full fledged web server on AWS cloud using Terraform with advanced options like content delivery system, advanced storage option without manual effort , an end to end automation with simple code. Lets starts our hands dirty.

In this demo we are going to use the following tools and services
- AWS EC2 (Amazon Elastic Compute Cloud)
- AWS EBS (Elastic Block Storage)
- AWS S3 (Amazon Simple Storage Service)
- Amazon CloudFront ( Content Delivery Network)
- Terraform
- Github
- Apache Web-server
Initially we need to install Terraform on our system . For installation procedure Click Here !
Step 1: Create a working directory and create a file with .tf extension
mkdir mytera
notepad aws.tf
Follow the below step and add the code to aws.tf file
Step 2 : Configure AWS provider

Here aws is the service provider and we are going to deploy our webserver in the region “ap-south-1”. Profile terauser is the user name which I created and configured in AWS AMI. For profile creation Click here!
Step 3: Creating a local value for storing current vpc id
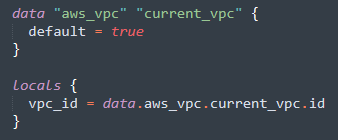
Here my default vpc id will be stored in vpc_id . So that it can be used across the module.
Step 4 : Creating Key Pair
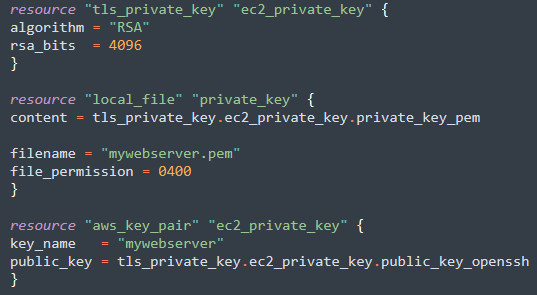
- The above code snippet (tls_private_key) will generates a secure private key and encodes it as PEM .
- local_file will store the private key in your local machine for future access .
- aws_key_pair will create a key pair named mywebserver in aws.
Step 5 : Create a security group with inbound HTTP, ssh and ICMP

Here we are creating a security group named allow_http_ssh_in which will create a inbound access to http, ssh and ICMP(ping) protocols.
Step 6: Create AWS instance with web-server provisioned
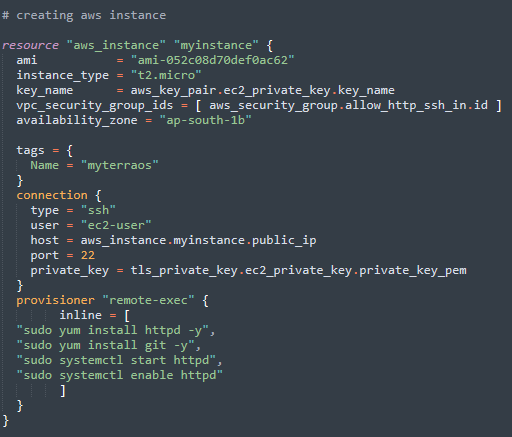
- resource aws_instance will create a aws instance with name myinstance
- ami is the machine image id . Here I have used RHEL 8. For detailed available ami list Click Here!
- vpc_security_group_ids is the security group id which we created in Step 5 .
- connection will connect to instance using ssh protocol as ec2-user with keys which we created in Step 4.
- provisioner “remote-exec” will run a remote script in aws instance using inline keyword . Here we are installing httpd and git through yum tool and starting the httpd services.
- The above installation and configuration (remote-exec) can also be done using ansible playbooks(Recommended) and direct shell scripts using provisioner file .
Step 6: Create EBS volume
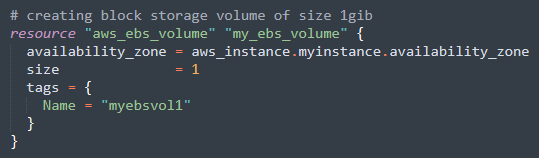
- We are creating a EBS (block storage) volume of 1 gib in the same availability zone .
- Here our motto is to mount this volume to aws instance for storing websites files and make it persistent (Even if the instance crashes our files will be safer in the EBS volume).
Step 7: Attaching EBS Volume to aws instance
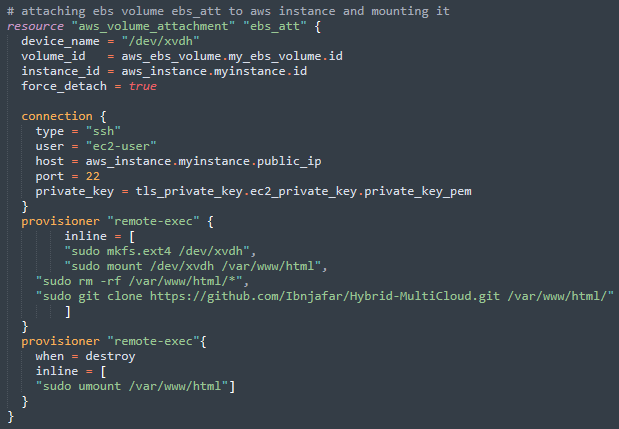
- The above code snippet will attach the EBS volume my_ebs_volume to aws instance my_instance
- And it will create a partition and mount the disk(ebs volume) to web-server directory (/var/www/html) .
- Then it will clone the code from GitHub and copy it to the (/var/www/html/) directory.
- When server crashes ,it will automatically get unmounted.
Step 8: Creating S3 Bucket
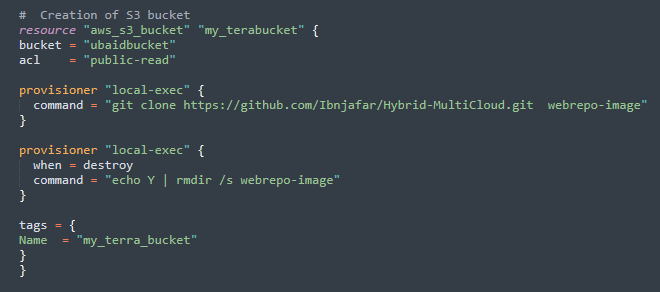
- Amazon Simple Storage Service (Amazon S3) is an object storage service that offers industry-leading scalability, data availability, security, and performance.
- The above code snippet will create a s3 bucket named “ubaidbucket”(Note that S3 bucket name is globally unique, and the namespace is shared by all AWS accounts. So give globally unique name) and access control as public.
- provisoner “local-exec” will clone the git repository containing images to my local machine in webrepo-image directory , so that it can be uploaded to S3 bucket.
Step 9: Uploading image to S3 Bucket
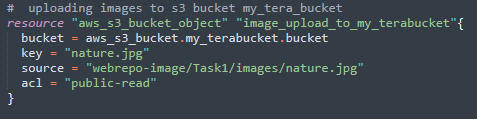
- Here we uploading the images stored in the webrepo-image(local machine) to my s3 bucket “ubaidbucket” .
Step 10: Creating local value for s3 origin id
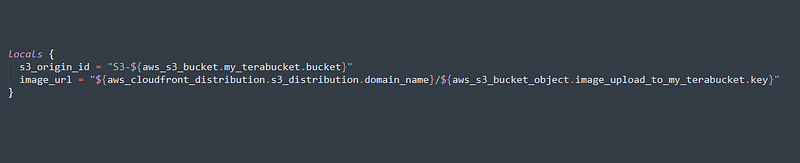
- Here we are storing the image url in image_url variable and s3 origin id for using it while creating cloudfront distribution.
Step 11 : Creating CloudFront distribution and connecting it to S3 image bucket
- Amazon CloudFront is a fast content delivery network service that securely delivers data, videos, applications, and APIs to customers globally with low latency, high transfer speeds, all within a developer-friendly environment.
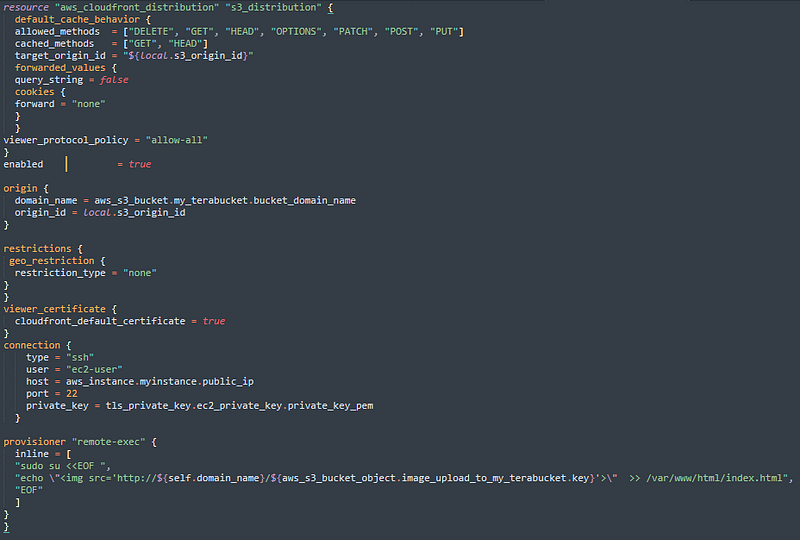
- It will create a cloud distribution with geo_restriction none( You can also use this feature to restrict access based on location).
- After creation it will connect to aws instance(myinstance) and copy the cloudfront url to index.html.
- So the user will get the object(image, video, data delivered from their edge location with low latency and high speed.
Step 12: Deploy our webserver
Applaud , You have done all the required things, lets execute this code
terraform init
terraform validate
terraform apply -auto-approve
- terraform init will install all the required plugin for the operation.
- terraform validate will check and validate your code for syntax check(optional )
- terraform apply -auto-approve will execute your code with auto approval mode.
Finally, We have deployed our web server with privileged features such as S3, CDN.
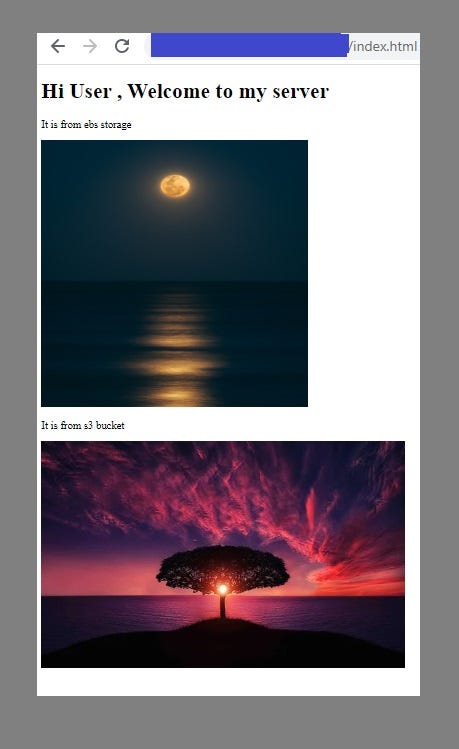
- Here in the webpage , you can see there are two images. One is stored in ebs volume and another one in S3.
- We can also store our image in EBS volume. But it is recommended to store the static files such as images,videos, documents in S3 Bucket for faster access , security, scalability and store the code files in EBS Volume for faster code execution.
If you want to delete the whole environment created ,you can issue the following command
terraform destroy -auto-approve
More Ideas:
- This code can be further improved by configuring , installing dependencies using ansible.
- By Linking with Jenkins we can automate the task whenever developer change the code for new updates, jenkins can automatically deploy the code in the server.
- Instead of deploying the webserver on direct aws instance , we can deploy it in docker container inside aws instance.
For complete code written in aws.tf file Click Here!
For complete webserver codes in Github
This repository contains codes and files for apache web server - Ibnjafar/webservergithub.com
Hope you liked the content (:
Please provide your collaborative ideas , suggestion and valuable feedback's.
Keep Learning ! Keep Sharing!


No comments:
Post a Comment